Step-by-step UBlocker Setup
Congratulations!!! on your purchase of a Ultimate Call Blocker (UBlocker). Please follow this step by step instructions to setup your UBlocker. These instructions apply to UBlocker LAN and WIFI versions.
Step 1. Connecting your phoneline
a. Locate the device labeled as "Phone Adapter" in the package.
– Allows the UBlocker to connect to your landline phone jack or modem port.
– Plugs into any of the four USB ports on the UBlocker.
– Includes two RJ11 sockets:
• LINE: Connects to your wall jack or modem port.
• PHONE: Connects to your phone or phone system.
– An RJ11 patch cord is included.
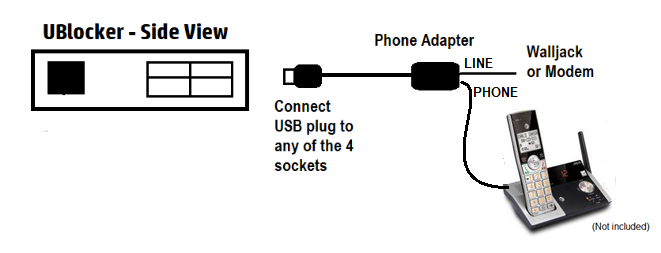
b. Connect the USB plug on the Phone Adapter to any the 4 USB ports available in the UBlocker (as shown in diagram below).
c. On the other side of the Phone Adapter, there are 2 phone sockets (or holes e.g., RJ11 sockets). One labeled "LINE", and the other labeled "PHONE". Plug in a phone cable (one is included in the package) to the socket labeled "LINE" on the Phone Adapter.Then, plug in the other side of the phone cable to thephone line(e.g., wall jack or modem port).
d. Next, you can plug in your existing phone system (handset or base) to the socket labeled "PHONE" on the Phone Adapter.
Important: This know that it is not required to have a phone connected to the Phone Adapter of the UBlocker in order for the UBlocker to work properly, however you will need a phone connected to the phone adapter in order to make sure you have dial tone going to the Phone Adapter. After you finish the UBlocker setup, you can unplug the phone and use it on any other wall jack, if desired.
Important:
- The Phone Adapter has two RJ11 sockets labeled LINE and PHONE.
- Plug the LINE port into the wall jack or modem port (the one with a dial tone) using an RJ11 telephone patch cable.
- If desired, connect your existing telephone (base or handset) to the PHONE port using another RJ11 patch cable (existing).
- A phone connection is optional — the UBlocker will still function correctly even without one connected.
- The Phone Adapter has a red led ON at all times indicating that it has power. It also has an intermittent green led ON indicating activity (off hook, answering or making calls).
Step 2. Powering your UBlocker device
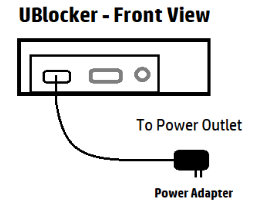
Plug the Power Adapter (included) into the micro USB port on the UBlocker, as shown below.
Then, connect the power adapter to a standard 120V wall outlet.
Important:
- For best performance and protection, connect the UBlocker to a UPS (Uninterruptible Power Supply).
→ This helps prevent damage and extends the life of your device during power interruptions. - Some power adapter models have a red led light ON indicating power is ON.
- Recommendation: If order to protect your UBlocker equipment as well as extend its lifespan, we recommend you use a UPS (Uninterruptible Power Supply) to plug in the power adapter. If a UPS is not available, use a surge-protected outlet to guard against power surges.
Step 3. Connecting your UBlocker to the Internet
Your UBlocker can connect to the Internet in two ways:
- LAN / Ethernet
- Wi-Fi
Note: We recommend you use a LAN / Ethernet connection in order to provide a more reliable connection.
LAN / Ethernet Setup
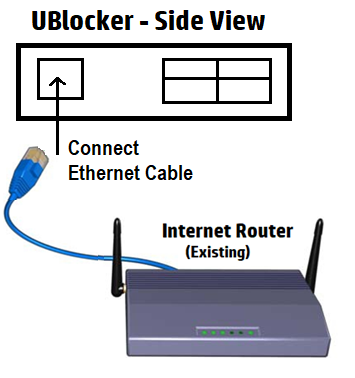
Follow these steps to connect your UBlocker directly to your router using an Ethernet cable.
If you have a UBlocker version WIFI or WL and need to use a Wi-Ficonnection, you may skip this section and go to Step 4.
- Take the included Ethernet cable and plug one end into your router.
- Your router (or modem) should have at least 4 Ethernet ports available to allow connecting other devices e.g., desktop PC, laptop, TV, etc.
- Plug the other end into the Ethernet port on your UBlocker.
Step 4. WIFI setup (optional, only apply to UBlocker WIFI or WL models)
PLEASE SKIP THIS STEP IF YOU ALREADY HAVE YOUR UBLOCKER CONNECTED DIRECTLY TO YOUR ROUTER WITH AN ETHERNET CABLE (e.g. completed Step 3 above).
Please connect your UBlocker to the Internet via Wi-Fi****only ifyou are not able to connect your UBlocker directly to your router with an Ethernet cable.
Important: Please make sure your UBlocker supports WIFI or WL. If you have a UBlocker LAN version, please skip this step.
Preparation:
-
You need a Wi-Fi-enabled device (smartphone, tablet, or laptop).
-
You will also need your Wi-Fi router’s SSID and password to complete the setup.
-
The SSID is the name of your router as it appears under “My Networks” or “Other Networks” on your Wi-Fi-enabled device.
-
Important: The SSID is case-sensitive, so type it exactly as shown.
-
If your router’s SSID is very long, it may be truncated in the network list. In that case, check the label on your router or contact your Internet Service Provider (ISP) for the full name.
⚠️ Caution: Most Wi-Fi setup failures occur because the SSID is entered incorrectly.
-
-
Important: If you connected your UBlocker to your router with an Ethernet cable, unplug the Ethernet cable from the UBlocker before starting the Wi-Fi setup. You can reconnect it after you finish the Wi-Fi setup, if desired.
4a) Connect to the UBlocker Network
- On your Wi-Fi device, go to Settings > Wi-Fi.
- Wait for a network named “UBlocker” to appear under available networks.
- Select UBlocker and enter the password: ultimateblocker
- Once connected, close the Wi-Fi settings.
Note: It may show “No Internet” — this is normal.
4b) Configure your home Wi-Fi
- Open a browser (e.g., Safari, Chrome, Firefox, IE) on your Wi-Fi device.
- Enter http://192.168.2.1 in the address bar and press Enter.
- On the page that appears, enter your Wi-Fi router’s SSID and password.
- Press the “Update Wi-Fi” button.
Important: Both SSID and password are case-sensitive. Enter the SSID (e.g. name) of your router exactly as it appears in your WIFI available networks list.
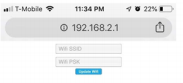
Please type your WIFI router’s SSID and Password of your WIFI router and press the “Update Wi-Fi” button. Important: Please make sure you type the SSID exactly as you see it under “Available networks”. Both entries are case sensitive.
Tips & Troubleshooting
- After powering up your UBlocker for the first time, it may take a few minutes (up to 15 minutes) for “UBlocker” to appear in your network list. Please be patient.
- Make sure to type “http://” before 192.168.2.1 in step 4b.
- Ignore browser messages like “This site can’t be reached” after pressing Update Wi-Fi. At this point, your UBlocker is switching from your device to your Wi-Fi router.
- Complete this setup within 5 minutes. Otherwise, the UBlocker will reboot and you may need to redo the process.
- Once the UBlocker connects to your Wi-Fi router, “UBlocker” will no longer appear in your device’s available networks.
Step 5. Creating your online account & adding your UBlocker device
Next, you need to create an online account to manage your UBlocker.
-
On any Internet-connected device (PC, laptop, smartphone, or tablet), go to:
https://ultimatecallblocker.com -
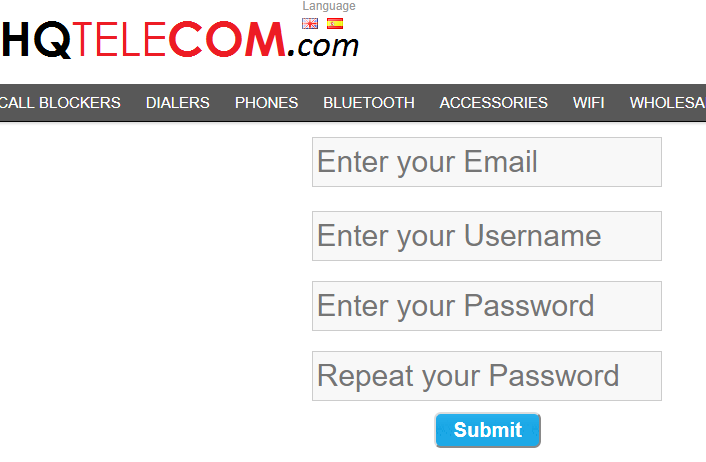
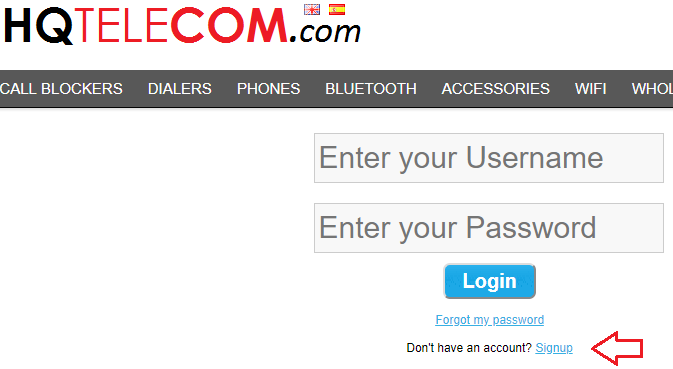
First-time users: Click the Sign Up link below the Username & Password fields to create a new account. Fill out the registration form and press Submit.
-
After registering, log in using your Username and Password.
-
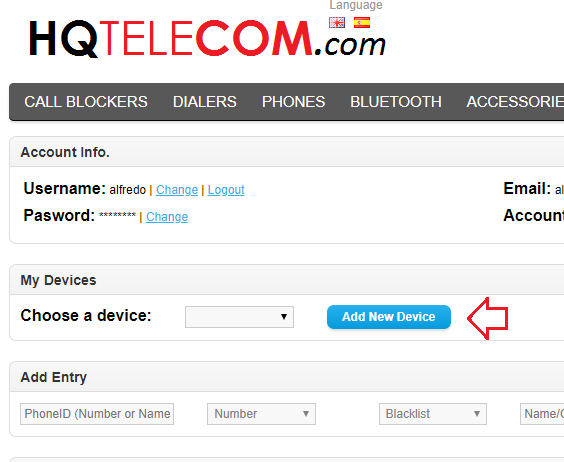
Once logged in, click the “Add New Device” button to register your UBlocker to your account.
Tip: Keep your account credentials safe — you’ll need them to manage your UBlocker and make future changes.
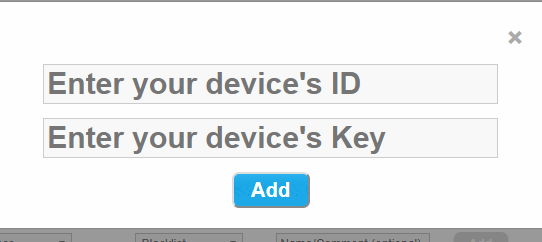
Note: The Alias field is optional (useful if you manage multiple devices).
Enter your UBlocker’s ID & Label Key (Refer to the sheet titled **"**Ultimate Call Blocker (UBlocker) Registration Codes & Installation Steps" included with your UBlocker showing your device's registration codes. It should look like this:
| ID: xxxxxxxxx Label Key: xxxxxxxx |
Warning: The Key and Label Key codes are case sensitive. Please be extra careful typing these 2 sets of codes.
Important: You can find your UBlocker’s ID and Key on the instruction sheets included in the package with your UBlocker device. These codes are unique to your UBlocker and are required for account registration and device management.
Tip: If after entering these codes online, your device is still not showing, please contact our technical support teamso we can assist you.
⚠️ If you lose the instruction sheets containing your ID and Key before you can register your device online, a factory reset will be required. In that case, you must mail your UBlocker to our main office for servicing.
Step 6. Testing your device's setup
After completing the setup above, follow these simple instructions to make sure your UBlocker is installed and working properly.
- Use your mobile phone or another phone line to make a test call to the number connected to your UBlocker.
- Let the call ring 2–3 times, then hang up.
- Log in to your account at https://ultimatecallblocker.com and press Refresh on your browser.
- Scroll to the “Call Log” section and check if your test call has been recorded.
✅ If your test call appears in the Call Log, your UBlocker is set up correctly — congratulations! You have completed the setup of your UBlocker.
Troubleshooting
If the test call is not logged, follow these steps:
-
Ensure the phone line is connected properly.
- Refer to step 1 above to review the Phone Adapter connections.
- Plug in your phone to the PHONE socket on the Phone Adapter and make sure you hear dial tone.
-
Verify that the UBlocker is properly connected to the Internet.
- If you are using an Ethernet cable to connect the UBlocker directly into your router, make sure you have a blinking green light (activity light) on both; the UBlocker's Ethernet port (check LEDs below the socket), and also on your router.
- If you can, please log to your router and check the connected devices to make sure there is one showing as "UBlocker". (Note: This may required help from your Internet service provider.)
- If you have another device connected to your router via Ethernet cable, try swapping the ports to see if you get connectivity as some ISPs may disable unused Ethernet ports).
- If you are using a Wi-Fi connection, please check your Wi-Fi enabled device to make sure the UBlocker is not showing under "My Networks" or "Other Networks". If the UBlocker is still showing, this means that your UBlocker is not connecting to the Internet yet. Please go over step 4 above again and make sure you enter the correct SSID and password.
-
Power cycle your UBlocker device (unplug the power adapter, wait 30 seconds and then plug it back on).
If the problem persists after these steps, contact our technical support team here
- Include your name, phone number, best time to call, and login info (username or registered email).
- A technician will assist you over the phone, usually within 1 business day.
What’s Next?
Once Your UBlocker Is Set Up and Tested
Your device is now fully functional and will begin blocking unwanted calls automatically. The UBlocker uses our Global Blacklist, which contains over 500,000 known scam and fraud numbers — and it continues to grow daily. Any call from one of these numbers will be blocked automatically and recorded in your Call Log for your reference. We recommend allowing your UBlocker to receive incoming calls for a few days so it can start building your New List. This list records all phone numbers that have recently called you. Once calls appear in your New List, you can review them and decide whether to move them to your Blacklist (to block future calls) or to your Whitelist (to allow calls from trusted numbers).
Simply wait for calls to come in and manage your lists anytime at https://ultimatecallblocker.com.
Click here to learn how to manage your UBlocker.
If you have any questions on how to manage your account online, please refer to the ULTIMATE CALL BLOCKER FAQs or Contact us.